 Portfolio
Portfolio View
Portfolio View is a snapshot grid of all your projects including general project information and budget and schedule summaries. You can filter the grid by Program and The PMWeb Grid grouping feature lets you create interactive summary views on the fly. Double-click a line in the grid to open the project.
Projects
Projects entered here are used in all PMWeb modules.
Header Fields
![]()
|
Field Name |
Comments |
|
Project ID |
This
field is required. |
|
Name |
This
field is not required. |
|
Project Type |
This
field is not required. It is a user-defined list. |
|
Project Status |
This
field is not required. It is a user-defined list. |
|
Property |
This
field is not required. You may link a project to a property, if you wish. |
|
Program |
This
field is not required. It is a user-defined list. |
|
Revision |
This
field is read-only. Revisions are editable copies of a record. You may create
as many revisions to a record as you wish. A new record is designated revision
0. Only the newest revision can be edited. Older revisions are locked as “Inactive”. |
|
Date |
This
field is read-only. The date the revision was created. |
|
Status |
The
default status is “Draft”. This field may be edited at any time to reflect
the record’s movement through an approval process. See Workflow for details
about automating the approval process. |
Details Fields
![]()
|
Field Name |
Comments |
|
Address 1 |
This
field is not required. |
|
Address 2 |
This
field is not required. |
|
City |
This
field is not required. |
|
State |
This
field is not required. It is a user-defined list. |
|
ZIP |
This
field is not required. |
|
Country |
This
field is not required. It is a user-defined list. |
|
Phone |
This
field is not required. |
|
Fax |
This
field is not required. |
|
Commitment Company |
This
field is not required. This is the “from” company on all commitments for the
project. |
|
Client |
This
field is not required. |
|
GC |
This
field is not required. |
|
Architect |
This
field is not required. |
|
Executive |
This
field is not required. |
|
Manager |
This
field is not required. |
|
Superintendent |
This
field is not required. |
|
Google Address |
This
field is not required. If you enter a valid address here this project will
appear in Map View. |
|
Owner |
This
field is not required. |
Image Gallery
See The Image Gallery.
Specifications
See Specifications.
Locations
Each project can have an unlimited number of locations. Many PMWeb record types - Estimates and Budgets, for example - allow you to specify Location when entering data.
|
Field Name |
Comments |
|
ID |
This
field is read-only. It may be edited by dragging the line up or down. When
you release the mouse all IDs will
be renumbered. |
|
Description |
This
field is required. |
|
Notes |
This
field is not required. |
Phases
Each project can have an unlimited number of phases. Many PMWeb record types - Estimates and RFIs, for example - allow you to specify Phase when entering data.
|
Field Name |
Comments |
|
Phase ID |
This
field is read-only. It may be edited by dragging the line up or down. When
you release the mouse all Phase IDs
will be renumbered. |
|
Name |
This
field is required. |
|
Description |
This
field is not required. |
|
Notes |
This
field is not required. |
Notes
See The Notes Tab.
Attachments
See The Attachments Tab.
Workflow
See Workflow.
Companies
PMWeb provides one, centralized, list of companies. Within each company you can store an unlimited number of addresses, departments and contacts. These records can then be used across the PMWeb platform.
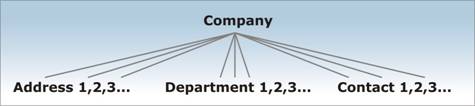
Each Company Has Many Addresses, Departments and Contacts
Header Fields
![]()
|
Field Name |
Comments |
|
Company ID |
This
field is required. |
|
Name |
This
field is not required. |
|
Type |
This
field is not required. It is a user-defined list. |
|
Abbreviation |
This
field is not required. |
Details Fields
![]()
|
Field Name |
Comments |
|
Primary Address |
This
field is read-only. It is determined by checking Primary in the Addresses Grid. |
|
Phone, Ext. |
These
fields are read-only. They are the Phone
& Ext. of the primary address. |
|
Fax |
This
field is read-only. It is the Fax
of the primary address. |
|
Email |
This
field is read-only. It is the Email
of the primary address. |
|
Website |
This
field is read-only. It is the Website
of the primary address. |
|
Federal Tax ID |
This
field is not required. |
|
State Tax ID |
This
field is not required. |
|
Account # |
This
field is not required. |
Specifications
See Specifications.
Addresses
Addresses Grid
|
Field Name |
Comments |
|
ID |
This
field is required. |
|
Address 1 |
This
field is not required. |
|
Address 2 |
This
field is not required. |
|
City |
This
field is not required. |
|
State |
This
field is not required. It is a user-defined list. |
|
ZIP |
This
field is not required. |
|
Country |
This
field is not required. It is a user-defined list. |
|
Phone |
This
field is not required. |
|
Ext. |
This
field is not required. |
|
Fax |
This
field is not required. |
|
Alt. Phone |
This
field is not required. |
|
Type |
This
field is not required. It is a user-defined list. |
|
Primary |
One,
and only one, address can be designated as primary. |
|
Inactive |
If
this record should no longer be used check this box. The default is
unchecked. |
|
Notes |
This
field is not required. |
Departments
Departments Grid
|
Field Name |
Comments |
|
ID |
This
field is required. |
|
Department Name |
This
field is not required. |
|
Address |
This
field is not required. It is the list of addresses you define in the Addresses Grid. |
|
Phone |
This
field is not required. |
|
Ext. |
This
field is not required. |
|
Fax |
This
field is not required. |
|
Cell |
This
field is not required. |
|
Alt. Phone |
This
field is not required. |
|
Email |
This
field is not required. |
|
Website |
This
field is not required. |
|
Type |
This
field is not required. It is a user-defined list. |
|
Primary |
One,
and only one, address can be designated as primary. |
|
Inactive |
If
this record should no longer be used check this box. The default is
unchecked. |
|
Notes |
This
field is not required. |
Contacts
Contacts Grid
|
Field Name |
Comments |
|
ID |
This
field is required. |
|
First Name |
This
field is not required. |
|
Last Name |
This
field is not required. |
|
Department |
This
field is not required. It is the list of departments you define in the Departments Grid. |
|
Address |
This
field is not required. It is the list of addresses you define in the Addresses Grid. |
|
Title |
This
field is not required. |
|
Phone |
This
field is not required. |
|
Ext. |
This
field is not required. |
|
Fax |
This
field is not required. |
|
Cell |
This
field is not required. |
|
Alt. Phone |
This
field is not required. |
|
Email |
This
field is not required. |
|
Website |
This
field is not required. |
|
Type |
This
field is not required. It is a user-defined list. |
|
Primary |
One,
and only one, address can be designated as primary. |
|
Inactive |
If
this record should no longer be used check this box. The default is
unchecked. |
|
Notes |
This
field is not required. |
Notes
See The Notes Tab.
Attachments
See The Attachments Tab.
Workflow
See Workflow.
Resources
You can create an unlimited number of Labor (self-performed or subcontract) and Equipment Resources for use across PMWeb modules. Labor and Equipment Resources, for example, are used in both Timesheets and the Dispatch Board.
Labor
Resources can be generic - “Plumber” - or made more specific by linking to a PMWeb company and/or contact.
Labor Grid
|
Field Name |
Comments |
|
ID |
This
field is read-only. |
|
Sub |
Check
this box if the resource is sub-contracted. |
|
Description |
This
field is required. |
|
Company |
This
field is not required. |
|
Contact |
This
field is not required. |
|
Resource Group |
This
field is not required. It is a user-defined list. |
|
Classification |
This
field is not required. It is a user-defined list. You can select more than
one Classification. |
|
Reg |
This
field is not required. The regular cost of the resource. |
|
OT |
This
field is not required. The overtime cost of the resource. |
|
Prem |
This
field is not required. The premium cost of the resource. |
|
Skills |
This
field is not required. It is a user-defined list. You can select more than
one Skill. |
|
Notes |
This
field is not required. |
|
Inactive |
Check
this box if the resource is to no longer be used. |
Setting Labor Rates
Double-click a line in the Labor Grid; the Labor Rates dialog opens.
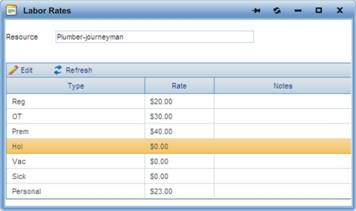
The Labor Rates Dialog
To edit a line click to select it and then click the Edit button in the grid header. For each Type enter a Rate. Click the Update Records button to save your edit. Click the Windows Close button in the upper right of the Labor Rates dialog to close it.
Equipment
Resources can be generic - “Backhoe” - or made more specific by linking to a PMWeb equipment record.
Equipment Grid
|
Field Name |
Comments |
|
ID |
This
field is read-only. |
|
Description |
This
field is required. |
|
Labor Resource |
This
field is not required. |
|
Equipment |
This
field is not required. |
|
Resource Group |
This
field is not required. It is a user-defined list. |
|
CSI Division |
This
field is not required. It is a user-defined list. |
|
Classification |
This
field is not required. It is a user-defined list. |
|
Operating |
This
field is not required. The operating rate of the resource. |
|
Standby |
This
field is not required. The standby rate of the resource. |
|
Idle |
This
field is not required. The idle rate of the resource. |
|
Notes |
This
field is not required. |
|
Inactive |
Check
this box if the resource is to no longer be used. |
Periods
For each project and property you can define periods in which to track costs. There are two ways to add periods:
Adding Periods by Line
- Select a project or property using the drop-down list in the toolbar.
- Click the Add line button in the grid header.
- Enter period information and click the Save button.
Adding Periods by Copying a Project or Property
- Select a project or property using the drop-down list in the toolbar.
- Click the Copy from Project or Property button.
- Select a project or property from the dialog.
Lists
Most of the drop-down lists in PMWeb are completely user-definable. Most user-definable lists come with default values but you can edit, add to or delete these defaults as you wish.
The Lists page contains a tree view of all of the user-definable lists in PMWeb. Each group in the tree represents a drop-down list.
Defining Lists
On the Lists page find the list you wish to customize in the tree. Click the plus icon to expand the list and see its contents.
- To edit a value, click it in the tree or right-click it and select Rename from the context menu.
- To delete an item, right-click it and select Delete from the context menu.
- To add an item, right-click the group heading and select New Item from the context menu.
Specifications
Many PMWeb record types contain a user-defined grid called Specifications. In each grid you can specify as many fields as you wish. When you define a specification grid you link it to a record type. When you are in that record type you can choose a specification grid that is linked to, and has meaning for, records of that type.
Defining Specification Grids
The Specifications page contains a list of all of the specification sets you’ve defined and is where you add, edit and delete them.
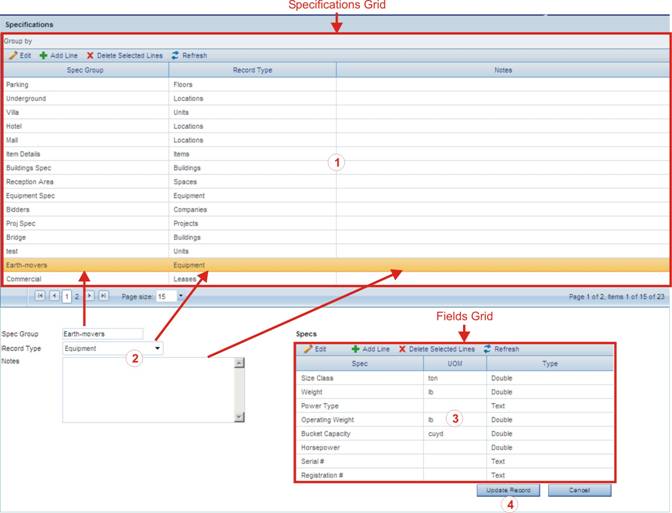
The Specifications Page
Adding or Editing a Specification Grid
- Click the Add Line or Edit button in the Specifications grid header. A new record opens at the bottom of the page or the selected one opens.
- Enter a Spec Group name, Record Type and Notes.
- Click the Add Line button in the Fields grid header. Enter the Spec name and select a UOM and data Type. Click the Save button to save the line.
- When you have finished defining fields click the Save or Update Record button.
Security
To set up PMWeb security follow these steps:
- Define user Groups
- Grant record permissions to Groups
- Define Users
- Assign Users to Groups
- Grant project and location access to Users
Defining Groups
Group Grid
|
Field Name |
Comments |
|
Group |
This
field is required. The name of the group. |
|
Description |
This
field is required. A description of the group. |
|
Default |
One,
and only one, group can be designated the default. New users are added to the
default group, but they may be moved to a different group. |
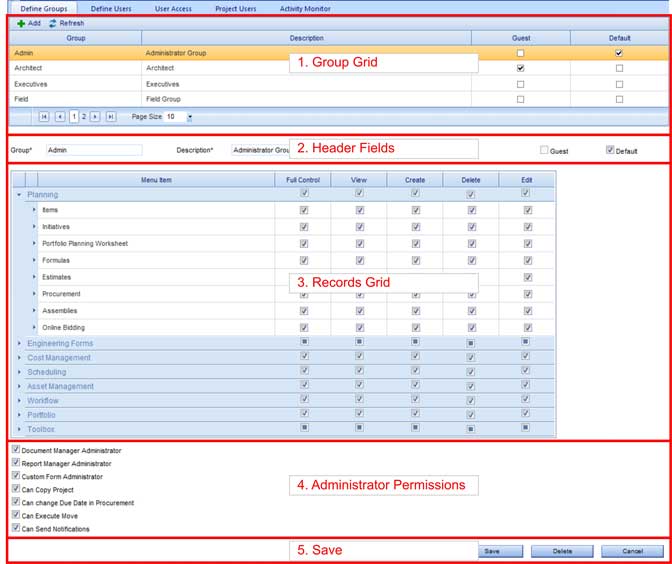
The Define Groups Tab
Adding a Group
To add a group:
1. Click the Add line button in the Group Grid header. New, empty, Header Fields, Records Grid and Administrator Permissions appear.
2. Type the Group, Description and select Default, if desired.
3. In the records grid click the Collapse/Expand icon to expand a module (Estimating, for example). For each record type place one or more check marks in the Add, Delete and Edit columns. If you select Read-Only the other three fields are automatically cleared. Likewise, if you click Add, Delete or Edit, Read-Only is automatically cleared. You can also check one of the boxes in the module title line; if you do, all of the records in the module are checked.
4. Check the boxes for Administrator Permissions, if applicable.
5. Click the Save button to save the group settings.
Editing a Group
To edit a saved group:
- Click one of the lines in the Group Grid to select it. The Header Fields, Records Grid and Administrator Permissions for that group load.
- Edit any of the group fields.
- Click the Save button to save the group settings.
Defining Users
Licenses
All of the fields in Licenses box are read-only. As licenses are assigned and unassigned in the users grid they are tallied here.
Users Grid
|
Field Name |
Comments |
|
ID |
This
field is required. |
|
Contact |
Select
a PMWeb contact to link to. This field is required. |
|
First Name |
This
field is not required. The default is the First Name of the Contact. |
|
Last Name |
This
field is not required. The default is the Last Name of the Contact. |
|
Abbreviation |
This
field is not required. |
|
License Type |
This
field is required. |
|
Group |
This
field is required. Users inherit their group’s record permissions. |
|
Password |
This
field is not required. |
|
Email |
This
field is read-only. It is the email address of the Contact. This is the email address PMWeb uses for notifications. |
|
Inactive |
Check
this box if the user should no longer be used in records. Inactive users
cannot log on to PMWeb. |
Defining User Access
Users may be granted access to projects and locations at four levels:
- System - User has access to all projects and locations, current and future.
- All Projects and All Locations - User has access to all projects or all locations, current and future.
- Programs and Location Types - User has access to only specified programs and
location types and all of their projects, current and future.
- Projects and Locations - User has access to only specified projects and locations.
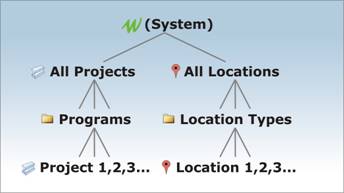
Four Levels of Access
Granting User Access
The User Access tab is composed of two panes. The left pane is a tree of the three levels of access described above. The right pane is a tree of users. To grant access drag a node from the access tree and drop it on the user.
For example, to grant Carole Shelby access to all projects, click the All Projects node in the access tree on the left, drag it to Carole’s name in the users tree and release the mouse. A plus icon appears next to Carole’s name. If you click the icon to expand you will see the All Projects icon. Carole now has access to all current projects as well as all future projects as they are added.