 Workflow
Workflow Overview
PMWeb Workflow routes PMWeb and custom forms for approval using routing templates you design. You can create workflow templates for one-time use or reuse them for all of your projects.
Easy to Use…
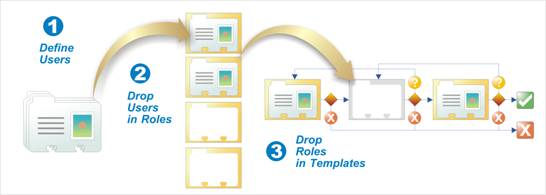
Drag and drop a PMWeb user to a workflow role then drop it in a template. You just created a Workflow.
…Powerful Features
Despite its ease of use, PM Workflow is loaded with sophisticated features:
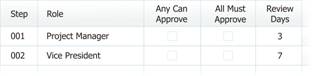
“All Must Approve” or “Any Can Approve” settings for each workflow step
“Review Days” at each step keep the workflow moving
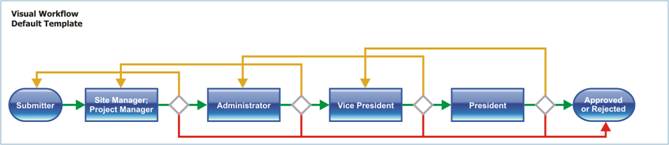
As you add approver steps to a template the workflow is drawn in real time.
Design your own custom forms, deploy them on the Web and seamlessly route them for approval.
Automated Process Management
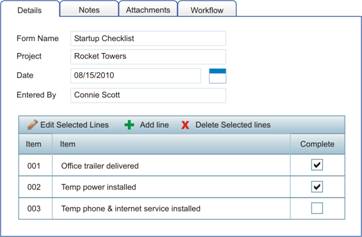
Workflow Inbox
The Inbox displays a list of all of the records for which you are a current approver. Click a record in the Inbox to open it.
Workflow
The Workflow/Setup/Workflow page allows you to make system-wide and project-specific settings. Before creating workflow settings select a project using the drop-down list in the toolbar.
Note: The “(System)” project is a special one that allows
you to create defaults for all new projects.
Defining Roles
PMWeb Workflow is a role-based solution. Roles are defined at the system level and assigned at system or project level.
![]()
Document Manager
Document Manager is a special role in PMWeb with the ability to shepherd the approval process. The Document Manager can be automatically notified that an approval is overdue, can assign proxy approvers and possesses other similarly powerful permissions. One Document Manager can be designated for the entire PMWeb system or a different one can be assigned to each project.
|
Field Name |
Comments |
|
Document Manager |
This
field is required. |
|
Notify On All Approvals |
Every
time a record is approved the Document
Manager receives an email notification. |
|
Notify On All Returns |
Every
time a record is returned the Document
Manager receives an email notification. |
|
Notify On All Rejects |
Every
time a record is rejected the Document
Manager receives an email notification. |
|
Notify On Final Approval |
When
a record is receives final approval the Document
Manager receives an email notification. |
|
CC |
Each
time the Document Manager is sent
these users receive a courtesy copy. |
|
Can Edit Records |
The
Document Manager may directly edit
a record routed for approval, even if his normal rights, assigned through Security, disallow access. |
|
Can Edit Workflow |
The
Document Manager may, record by
record, edit the assigned template. |
Define Roles
There are two ways to add lines to the grid:
Using the Add Line Button to Add Roles
Click the Add Line button in the grid header. A new line opens for editing. Type a name for the role and select a user to assign. Click the Save button to save the line.
Using Drag-and-drop to Add Roles
Click a user in the Users tree and drag it to the Roles grid. When you release the mouse a new line is opened for editing with the User filled in. Type a name for the role and click the Save button to save the line.
Templates
Template Fields
|
Field Name |
Comments |
|
Select Template |
Select
a template from the list to load it for editing or select “Add Template” to
create a new one. |
|
Template Name |
This
field is required. |
|
# of days for original
submitter to resubmit |
If
the original submitter doesn’t resubmit within this number of days the Document Manager is automatically notified. |
|
Allow returns to
recalculate due dates. |
If
this is checked all subsequent dues dates are recalculated when a record is
returned. |
|
Allow resubmitter to edit. |
If
this is checked the record may be edited before being resubmitted. If not,
only workflow comments may be added before resubmitting. |
Roles Grid
|
Field Name |
Comments |
|
Step |
This
field is read-only. To edit this field click and drag it up or down in the
grid. When you release the mouse the steps will be renumbered. |
|
Roles |
This
field is required. You may select one or more roles for each line. |
|
Any Can Approve, All Must
Approve |
You
must select one or the other of these fields. These settings apply to lines
with more than one role. If Any Can
Approve is checked the first user to approve automatically sends the
record to the next approval step. |
|
Review Days |
If
no decision is made on this step in this many days the Document Manager is automatically notified. |
|
Can Edit Records |
The
approvers on this line may directly edit a record routed for approval, even
if their normal rights, assigned through Security, disallow access. |
|
Notify on All Approvals |
Every
time a record is approved the approvers on this line receive an email
notification. |
|
Notify on All Returns |
Every
time a record is returned the approvers on this line receive an email
notification. |
|
Notify on All Rejects |
Every
time a record is rejected the approvers on this line receive an email
notification. |
|
Notify on All Withdrawals |
Every
time a record is withdrawn the approvers on this line receive an email
notification. |
|
Notify on Final Approval |
When
a record is receives final approval the approvers on this line receive an
email notification. |
|
CC |
Each
time a workflow decision is made these users receive a courtesy copy. |
There are two ways to add lines to the grid:
Using Add Line Button to Add Roles to Templates
Click the Add Line button in the grid header. A new line opens for editing. Edit the line and click the Save button.
Using Drag-and-drop to Add Roles to Templates
Click one or more roles in the Roles tree and drag them to the Roles grid. When you release the mouse new lines open for editing in the grid. Edit the line and click the Save button.
Visual Workflow
The Visual Workflow control is a graphical display of the data you enter in the Roles grid and is immediately redrawn as the Roles grid is edited.
Business Process Models
The Business Process Model (BPM) tab is where you select a default workflow template to use for each record type, including custom forms you create yourself. If you select “”(Do Not Use Workflow)” users will not be required to submit records of that type for approval and may change the status of records as they wish.
Notes:
- Templates
selected for the “(System)” project are inherited by default by new
projects, but may be edited.
- Selecting “(Do Not Use Workflow)” for the “(System)” project means that workflow will not be allowed for all new projects.
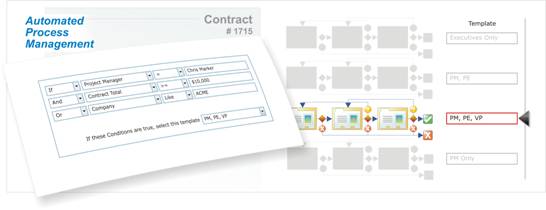
Automated Process Management
Automated Process Management(APM) rules fine-tune the process of assigning the correct workflow Templates. An example of APM rules is one that distinguishes between Subcontracts and Purchase Orders. If the Commitment Type is “Subcontract” one template is used; if it is “Purchase Order” a different template is used. APM rules can be evaluate a single field in the record or can consist of many layers of conditional logic.
Creating APM Rules

Creating APM Rules
- Click the New button in the toolbar. A new, empty rules record loads.
- Click a form in the Forms tree to select it.
- Enter a Rule Name.
- Select the template to use if the rule evaluates as true.
- Click the Save button on the toolbar.
- Click the Add Condition button in the grid header.
- Enter the condition information and click the Save button in the grid header.