Basics
Navigating in PMWeb
The Menu
The PMWeb Menu is the primary tool to navigate between the modules and the record types within those modules.

The PMWeb Menu
The menu is composed of module bars and module trees. Click a module bar to display the module tree. The currently active module is displayed in the dark blue bar at the top of the menu. Click the Plus or Minus icons in the tree to expand and collapse the tree nodes. To open a record type click it in the tree.
Note: The menu and tree only display modules and record
types to which you’ve been granted access.
Managers
PMWeb manager pages provide a summary view of records in a grid format. Records can be interactively filtered and users can open, add or delete records with a click. Manager pages are available for most PMWeb record types and are powerful, fast and easy to use, often making it unnecessary to generate and print reports.
The RFI Manager Page
Double-click a line in the Manager grid to open the record.
Customizing Managers
See The PMWeb Grid for tips on customizing and using PMWeb grids.
Explorers
Most PMWeb modules have an explorer pane, a tree view of the module’s records. Explorers allow you to find, edit and add records with a simple context menu and some even allow users to move records with a simple drag-and-drop.
Asset Management Explorer Pane
- Click the Expand/Collpase button to show or hide the explorer pane.
- Click the splitter and drag it left or right to resize the explorer pane.
- Click the group by list and select the grouping method you wish.
- Click the plus and minus icons to expand or collapse a node in the tree.
- Right-click a node in the tree to display the context menu.
- Double-click a node in the tree to open the record.
- In the Asset Management explorer pane, drag and drop occupants or equipment to move them to new locations.
Note: The appearance of and the features available in the
Explorer panes vary by module.
Toolbars
Generate Button
PMWeb’s Generator feature allows you to use a record to create related records with the click of a button. For example, one estimate can generate dozens of purchase orders.
![]()
The Generate Button
In pages that offer Generator functionality click the Generate button on the toolbar and select the type of record you wish to create. A pop-up screen will open, displaying options you can use to customize the records you are generating.
Inactive
Most PMWeb records can be made inactive. Generally, inactive records are no longer needed to be used when creating other records. For example, if you no longer want users to create new commitments for a project, making the project record inactive will remove it from the Project drop-down list in the Commitments page. To make a record inactive, open it and click the Inactive toggle button on the toolbar.
Calendar
Virtually all PMWeb records can be added to your reminder calendar. To add a record to the calendar click the Calendar button on the toolbar.
The PMWeb Grid
Customizing the Grid
Most of the grids in PMWeb allow you to customize the way they look and act. The following table shows the customizations you can make to most PMWeb grids.
Resize Columns
Place your cursor over the divider between column headers. The cursor will change to a double-headed arrow and a tool tip “Drag to resize” will be displayed. Click and drag to the left or right to resize the column.
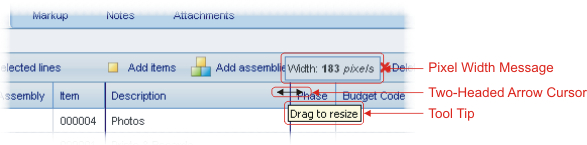
Resize Columns
Swap Column Order
Click and hold a column header and drag to the left or right. Two yellow arrows appear to indicate the column’s new position.
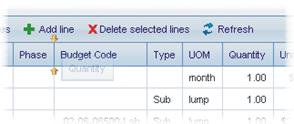
Two Yellow Arrows Indicate Column’s New Position
Sort by Column
Right-click on the column header you wish to sort by and select Sort Ascending or Sort Descending in the context-sensitive menu. To remove sorting, right-click again on the column header and select Clear Sorting.
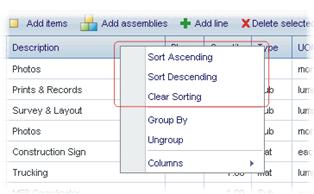
Sorting Options
Show/Hide Columns
Right click on any column header and hover your cursor over Columns in the context-sensitive menu. A fly out menu appears showing all of the columns in the grid. Place a check in the checkbox for each column you wish to show in the grid.
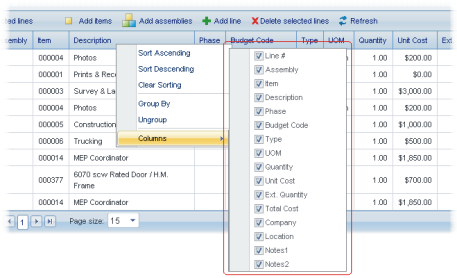
Show/Hide Columns Fly out Menu
Group by Columns
Right-click on the column header you wish to sort by and select Group By in the context-sensitive menu.
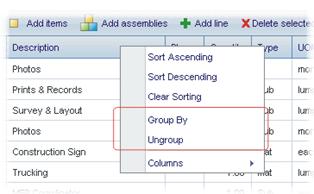
Grouping Options
You can also group by dragging a column header to the Group by header bar.
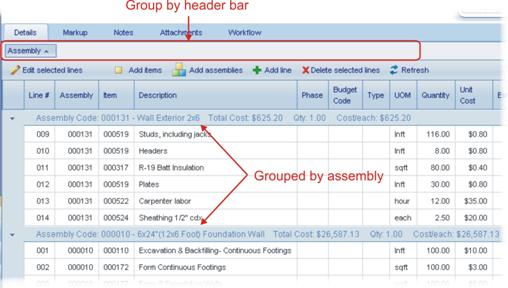
Drag Column Headers to the Group By Header Bar
You can use either technique to group by more than one column header.
By default, groups are sorted in ascending order. Click the Group button in the Group by header bar to reverse the sort.
To remove grouping either right-click on a column header and select Ungroup in the context-sensitive menu or drag the Group button for the header off of the Group by header bar.
Filling Columns of Data
The detail grid has a feature similar to the Excel "fill-down". To use this feature do the following:
- Add the data you want to copy to the clipboard using copy or control-C.
- Click to select a line, control-click to select multiple lines. This highlights the lines.
- Click Edit. This puts the lines in edit mode.
- Click the column header for the column where you want to paste the data. This highlights all the fields with a red line.
- Click control-V to paste the data. If the data is only added to one field, that field had the focus. Click away from the grid and click control-V again.
Change Line Order
To change the Line # of any line in the estimate click it once to select it and then click and drag it to the new location. A dashed line will indicate the new location before you release the mouse. All lines are automatically renumbered when you drag and drop.
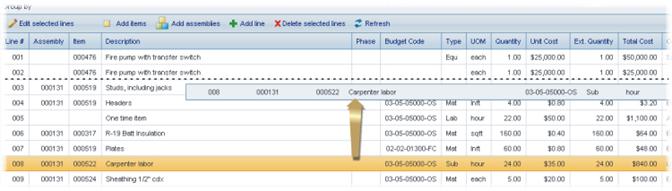
Click a Line and Drag to a New Location
Change Page Size
To change the number of lines displayed in each page of the grid, select a value in the Page Size drop-down list in the grid footer.
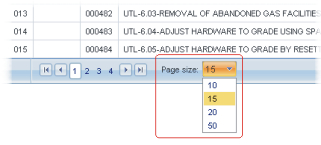
The Page Size Drop-down
Note: Not all of the customizations listed above are
available in every grid.
Navigating
in the Grid
If your grid contains more lines than can be displayed on one grid page (see Change Page Size for details on changing the number of lines displayed per page) you can use the controls in the grid footer to navigate from page to page.

The Grid Footer
The following controls are available in the grid footer:
|
Control |
What it Does |
|
First Page |
Displays
the first page of records |
|
Previous |
Displays
the page one before the current page |
|
Page Selectors |
Click
a number to display a particular page |
|
Next |
Displays
the page one after the current page |
|
Last Page |
Displays
the last page of records |
|
Recap Message |
Displays
the total number of records and the total number of pages |
Specifications
Many types of PMWeb records provide a Specifications grid that you can use to track any type of information you’d like.
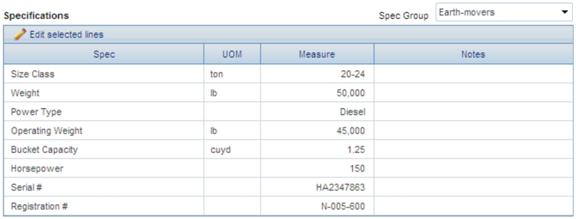
A Specifications Grid on the Equipment Page
Specifications are user-definable and are grouped by record type. This means, for example, that on the Equipment page you only work with Specification Groups that you have said pertain to equipment records.
Defining Specifications Groups
Before you can use specifications in a record you must define them (see Specifications).
Using Specifications Groups
Open the record for which you wish to enter specifications. Use the Spec Group drop-down list to select a Specification Group. The grid is immediately populated with the fields defined for the group.
Specification Grid
|
Field Name |
Comments |
|
Spec |
This
field is read-only. |
|
UOM |
This
field is read-only. It is a user-defined list. |
|
Measure |
This
field is not required. Enter the data for this record here. |
|
Notes |
This
field is not required. Enter notes about the specification here. |
Note: Selecting a new Specification Group for a record
requires that previously entered specification data for the record be deleted.
If you select a new Spec Group PMWeb asks you to confirm that you wish to
delete existing specification data.
The Notes Tab
You may enter as many notes as you’d like for each record. PMWeb’s Notes Editor allows you to create notes with the rich formatting of a word processor document.
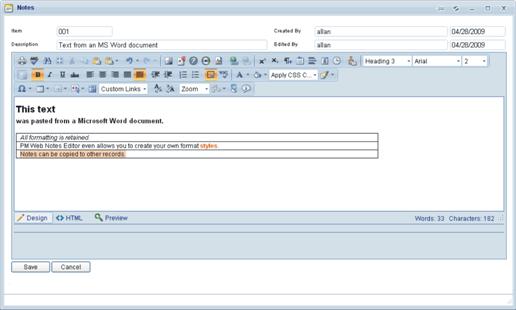
PMWeb Notes Editor
Creating a Note
To create a note, click the Add Line icon in the header of the notes grid. Type a Description and then type text in the editor area or paste it from another document. When you finish editing the note click Save. The Notes Editor window closes and the note information appears in the grid on the Notes tab.
Viewing and Editing a Note
To preview a note, click on it once in the grid. To open a note, double-click it.
The Attachments Tab
- You may attach as many documents to a record as you wish.
Creating an Attachment
To create an attachment, click the Add Line icon in the header of the attachments grid. Type a Description.
Attachment Methods
You may use one of three methods of attachment:
- File Manager - Attach to an item that already resides in PMWeb’s Document Manager. To use this method click the radio button to the left of the Document Manager option and click the Browse hyperlink. A pop-up window showing the PMWeb File Manager opens. Select the item you wish to attach and click the Open button. The pop-up window closes and the attachment shows in the File field.
- Link - Attach a URL (uniform resource locator). To use this method click the radio button to the left of the Link option and type the URL in the File field.
- Upload - Upload the item to PMWeb and attach it to the current record. To use this method click the radio button to the left of the Upload option and then click the Browse button. The Choose File pop-up window opens. Select the item you wish to attach and click the Open button. The Choose File pop-up window closes and the attachment shows in the File field.
If you want to display the attachment in the Image Gallery check the Display in Image Gallery checkbox. (Note: Not all PMWeb record types have an Image Gallery.) Enter Notes about the attachment if you wish. Click the Save icon to save and, if necessary, upload the attachment.
Opening an Attachment
To open an attachment click in the File field in the grid.
The Image Gallery
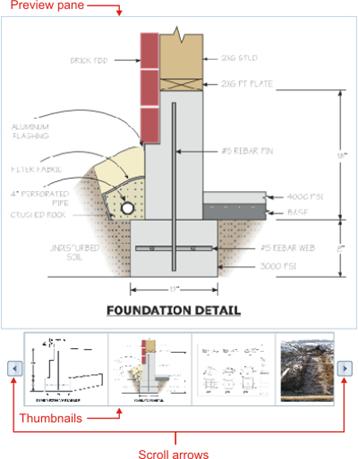
The Image Gallery
Adding Images to the Image Gallery
To display an image in the Image Gallery, add it as an attachment (see The Attachments Tab) and place a check in the Display in Image Gallery checkbox.
Removing Images from the Image Gallery
To remove an image from the Image Gallery, either uncheck the Display in Image Gallery checkbox or delete the attachment.
Using the Image Gallery to View Images
Hover your mouse over the left and right arrows in the Image Gallery to scroll the thumbnails. Click a thumbnail to view it in the preview pane. Click the image in the preview pane to open the image in a pop-up page.