 Asset Management
PMWeb provides a single platform from which you manage all of your assets and it does so with an easy-to-use and powerful graphical interface.
PMWeb tracks three major asset types:
- Physical sites (Locations, Buildings, Floors & Spaces). Physical sites have a hierarchical relationship:
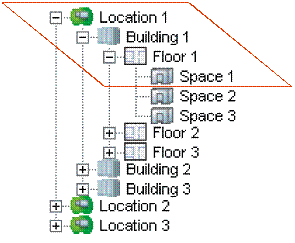
The Hierarchy of Location/Building/Floor/Space
- Equipment (both installed & mobile)
- Inventory
Asset Explorer
The Asset Explorer provides an interactive graphical view of your assets. See Explorers for information on using this tool.
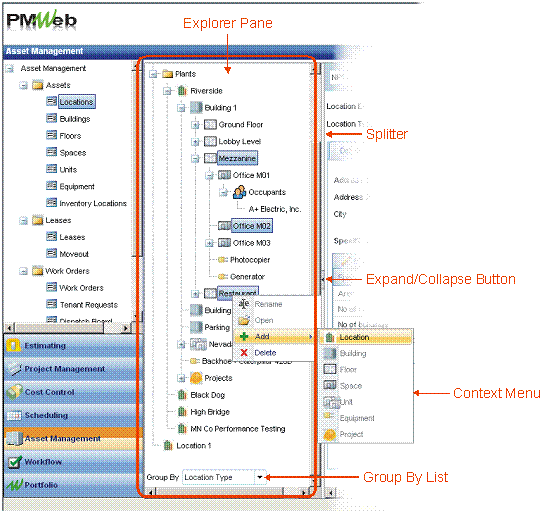
The Asset Explorer
Locations
Locations are the top level of the physical sites hierarchy, or tree.
Header Fields
![]()
|
Field Name |
Comments |
|
Location ID |
This field is required.
This is an alphanumeric field. |
|
Name |
This field is not required. |
|
Location Type |
This field is not required.
It is a user-defined list of values. |
|
Revision |
This field is read-only.
Revisions are editable copies of a record. You may create as many revisions
to a record as you wish. A new record is designated revision 0. Only the
newest revision can be edited. Older revisions are locked as “Inactive”. |
|
Date |
This field is read-only.
The date the revision was created. |
|
Status |
The default status is
“Draft”. This field may be edited at any time to reflect the record’s movement
through an approval process. See Workflow for details about
automating the approval process. |
Details Fields
![]()
|
Field Name |
Comments |
|
Address 1 |
This field is not required. |
|
Address 2 |
This field is not required. |
|
City |
This field is not required. |
|
State |
This field is not required. |
|
ZIP |
This field is not required. |
|
Country |
This field is not required. |
|
Owner Contact |
This field is not required. |
Specifications Grid
See Specifications for information on using Specifications Grids.
Buildings
The Buildings tab grid displays all of the Buildings linked to this Location. Click a line in the grid to open the Building record.
Floors
The Floors tab grid displays all of the Floors linked to this Location. Click a line in the grid to open the Floor record.
Spaces
The Spaces tab grid displays all of the Spaces linked to this Location. Click a line in the grid to open the Space record.
Projects
The Projects tab grid displays all of the Projects linked to this Location. Click a line in the grid to open the Project record.
Work Orders
The Work Orders tab grid displays all of the Work Orders linked to this Location. Click a line in the grid to open the Work Order record.
Equipment
The Equipment tab grid displays all of the Equipment whose Current Location is this Location. Click a line in the grid to open the Equipment record.
Notes
See The Notes Tab.
Attachments
See The Attachments Tab.
Workflow
See Workflow.
Buildings
Buildings are the second level of the physical sites hierarchy, below Locations.
Header Fields
![]()
|
Field Name |
Comments |
|
Location |
This field is required. |
|
Building ID |
This field is required.
This is an alphanumeric field. |
|
Name |
This field is not required. |
|
Revision |
This field is read-only.
Revisions are editable copies of a record. You may create as many revisions
to a record as you wish. A new record is designated revision 0. Only the
newest revision can be edited. Older revisions are locked as “Inactive”. |
|
Date |
This field is read-only.
The date the revision was created. |
|
Status |
The default status is
“Draft”. This field may be edited at any time to reflect the record’s
movement through an approval process. See Workflow for details about
automating the approval process. |
Details Fields
![]()
|
Field Name |
Comments |
|
Address 1 |
This field is not required. |
|
Address 2 |
This field is not required. |
|
City |
This field is not required. |
|
State |
This field is not required. |
|
ZIP |
This field is not required. |
|
Country |
This field is not required. |
Specifications Grid
See Specifications for information on using Specifications Grids.
Floors
The Floors tab grid displays all of the Floors linked to this Building. Click a line in the grid to open the Floor record.
Spaces
The Spaces tab grid displays all of the Spaces linked to this Building. Click a line in the grid to open the Space record.
Work Orders
The Work Orders tab grid displays all of the Work Orders linked to this Building. Click a line in the grid to open the Work Order record.
Equipment
The Equipment tab grid displays all of the Equipment whose Current Location is this Building. Click a line in the grid to open the Equipment record.
Notes
See The Notes Tab.
Attachments
See The Attachments Tab.
Workflow
See Workflow.
Floors
Floors are the third level of the physical sites hierarchy, below Buildings.
Header Fields
![]()
|
Field Name |
Comments |
|
Location |
This field is required. |
|
Building |
This field is required. |
|
Floor ID |
This field is required.
This is an alphanumeric field. |
|
Name |
This field is not required. |
|
Revision |
This field is read-only.
Revisions are editable copies of a record. You may create as many revisions
to a record as you wish. A new record is designated revision 0. Only the
newest revision can be edited. Older revisions are locked as “Inactive”. |
|
Date |
This field is read-only.
The date the revision was created. |
|
Status |
The default status is
“Draft”. This field may be edited at any time to reflect the record’s
movement through an approval process. See Workflow for details about
automating the approval process. |
Details Fields
![]()
Specifications Grid
See Specifications for information on using Specifications Grids.
Spaces
The Spaces tab grid displays all of the Spaces linked to this Floor. Click a line in the grid to open the Space record.
Work Orders
The Work Orders tab grid displays all of the Work Orders linked to this Floor. Click a line in the grid to open the Work Order record.
Equipment
The Equipment tab grid displays all of the Equipment whose Current Location is this Floor. Click a line in the grid to open the Equipment record.
Notes
See The Notes Tab.
Attachments
See The Attachments Tab.
Workflow
See Workflow.
Spaces
Spaces are the fourth level of the physical sites hierarchy, below Floors.
Header Fields
![]()
|
Field Name |
Comments |
|
Location |
This field is required. |
|
Building |
This field is required. |
|
Floor |
This field is required. |
|
Floor ID |
This field is required.
This is an alphanumeric field. |
|
Name |
This field is not required. |
|
Revision |
This field is read-only.
Revisions are editable copies of a record. You may create as many revisions
to a record as you wish. A new record is designated revision 0. Only the
newest revision can be edited. Older revisions are locked as “Inactive”. |
|
Date |
This field is read-only.
The date the revision was created. |
|
Status |
The default status is
“Draft”. This field may be edited at any time to reflect the record’s
movement through an approval process. See Workflow for details about
automating the approval process. |
Details Fields
![]()
|
Field Name |
Comments |
|
This space may be occupied. |
Check this box if you wish
to allow occupants to be moved into the space. |
Specifications Grid
See Specifications for information on using Specifications Grids.
Occupants
The Occupants tab grid displays all of the occupants, both past and present, who are linked to this Space.
Use the filter drop-down to display:
- Current occupants only - (Those lines in the grid where the Actual Move-out field is empty.)
- Past occupants only - (Those lines in the grid where the Actual Move-out field is not empty.)
- All occupants - (Both current & past occupants.)

The Occupants Filter Drop-down
The Occupants Grid
|
Field Name |
Comments |
|
Occupant |
This field is required. The
Name of the occupant. Occupants
can be Companies, Departments or Contacts. |
|
Scheduled Move-in |
This field is not required.
Type a date in the field or click the field with the mouse to open a selector
calendar. |
|
Actual Move-in |
This field is required.
Type a date in the field or click the field with the mouse to open a selector
calendar. |
|
Scheduled Move-out |
This field is not required.
Type a date in the field or click the field with the mouse to open a selector
calendar. |
|
Actual Move-out |
This field is not required.
PMWeb defines current occupants as lines in this grid where Actual Move-out is empty. Type a date
in the field or click the field with the mouse to open a selector calendar. |
|
Work Order |
This field is not required.
You may link this occupant to a Work Order using the drop-down list. |
|
Notes |
This field is not required.
Notes about the occupant. |
|
Calendar |
This field is not required.
Place a check in this box if you wish to flag this occupant for a calendar reminder.
You can query PMWeb for all occupants flagged for Calendar. |
|
Calendar Date |
This field is not required.
If you check Calendar you can associate a date with it here. Type a date in
the field or click the field with the mouse to open a selector calendar. |
Occupant Move-in
To move an occupant into a space click the Add Line button in the grid header and enter the data. Do not enter an Actual Move-out date.
Delete an Occupant
Deleting an occupant removes them completely from the occupant history of this space. This cannot be undone. To delete occupants click one or more lines to select them and then click the Delete Selected Lines button in the grid header. A pop-up dialog is displayed asking you to confirm the deletion. Click the OK button to continue.
Occupant Move-out
To move occupants out of a space click one or more lines to select them and then click the Move-out Selected Lines button in the grid header. The Occupants Move-out dialog opens.
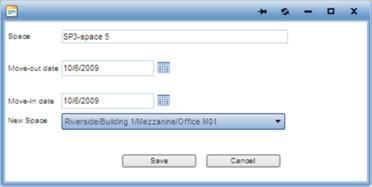
The Occupants Move-out Dialog
|
Field Name |
Comments |
|
Space |
This field is read-only.
This is the currently occupied space. |
|
Move-out date |
This field is required. The
default is today. Type a date in the field or click the Calendar button to
open a selector calendar. |
|
Move-in date |
This field is required. The
default is today. Type a date in the field or click the Calendar button to
open a selector calendar. |
|
New Space |
This field is not required.
If the selected occupant(s) will be moving into a different space, select it
using the drop-down list. If they will not be moving into a different space,
leave this field empty. |
When you click the Save button:
- The Move-out Occupants Dialog closes.
- The Actual Move-out date is copied to the spaces occupants grid.
- If a New Space was selected, Move-in records are created for each occupant in the new space.
Work Orders
The Work Orders tab grid displays all of the Work Orders linked to this Space. Click a line in the grid to open the Work Order record.
Equipment
The Equipment tab grid displays all of the Equipment whose Current Location is this Space. Click a line in the grid to open the Equipment record.
Notes
See The Notes Tab.
Attachments
See The Attachments Tab.
Workflow
See Workflow.
Equipment
PMWeb allows you to track all of the equipment you own, install or maintain. PMWeb equipment may be installed at a fixed location or may be mobile.
Header Fields
![]()
|
Field Name |
Comments |
|
Name |
This field is required. |
|
Current Location |
This field is not required.
Once the record has been saved the first time this field is read-only and is
the location on the Moves tab where the Actual Move-out field is empty. |
|
Revision |
This field is read-only.
Revisions are editable copies of a record. You may create as many revisions
to a record as you wish. A new record is designated revision 0. Only the
newest revision can be edited. Older revisions are locked as “Inactive”. |
|
Date |
This field is read-only.
The date the revision was created. |
|
Status |
The default status is
“Draft”. This field may be edited at any time to reflect the record’s
movement through an approval process. See Workflow for details about automating
the approval process. |
Details Fields
![]()
Specifications Grid
See Specifications for information on using Specifications Grids.
Moves
The Moves tab grid displays all of the move events of the Equipment.
The Moves Grid
|
Field Name |
Comments |
|
Location |
This field is required. Locations
can be PMWeb Locations, Buildings, Floors, Spaces or Projects. |
|
Scheduled Move-in |
This field is not required.
Type a date in the field or click the field with the mouse to open a selector
calendar. |
|
Actual Move-in |
This field is required.
Type a date in the field or click the field with the mouse to open a selector
calendar. |
|
Scheduled Move-out |
This field is not required.
Type a date in the field or click the field with the mouse to open a selector
calendar. |
|
Actual Move-out |
This field is not required.
PMWeb defines current location as the line in this grid where Actual Move-out is empty. Type a date
in the field or click the field with the mouse to open a selector calendar. |
|
Cost |
This field is not required.
You may enter the cost of the move for reference. |
|
Work Order |
This field is not required.
You may link this move to a Work Order using the drop-down list. |
|
Notes |
This field is not required.
Notes about the move. |
|
Calendar |
This field is not required.
Place a check in this box if you wish to flag this occupant for a calendar
reminder. You can query PMWeb for all moves flagged for Calendar. |
|
Calendar Date |
This field is not required.
If you check Calendar you can associate a date with it here. Type a date in
the field or click the field with the mouse to open a selector calendar. |
Equipment Move-in
There are two ways to create Equipment move-in records:
- When first creating the Equipment record, by selecting a Current Location in the page header.
- Using Equipment Move-out. (When you move a piece of equipment out of a location you create a move-in record at the new location.)
Equipment Move-out
To move a piece of equipment click the Move-out button in the grid header. The Equipment Move dialog opens.
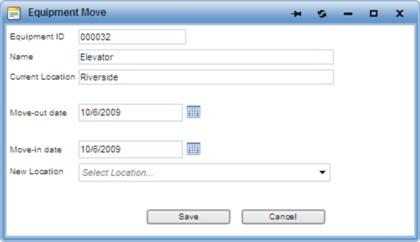
The Equipment Move Dialog
|
Field Name |
Comments |
|
Equipment ID |
This field is read-only. |
|
Name |
This field is read-only. |
|
Current Location |
This field is read-only. |
|
Move-out date |
This field is required. The
default is today. Type a date in the field or click the Calendar button to
open a selector calendar. |
|
Move-in date |
This field is required. The
default is today. Type a date in the field or click the Calendar button to
open a selector calendar. |
|
New Location |
This field is required. |
When you click the Save button:
- The Equipment Move Dialog closes.
- The Actual Move-out date is copied to the equipment moves grid.
- A Move-in record is created in the equipment moves grid.
Work Orders
The Work Orders tab grid displays all of the Work Orders linked to this Equipment. Click a line in the grid to open the Work Order record.
Cost Worksheet
The Cost Worksheet tab gives you interactive tools to:
- Calculate a depreciation schedule for the asset
- Calculate the cost to own the asset
- Calculate the cost to operate the asset
- Calculate the total cost of ownership of the asset
Depreciation
|
Field Name |
Comments |
|
Cost |
Enter the acquisition cost. |
|
Salvage |
Enter the salvage value at
the end of the asset’s life. |
|
Life (years) |
Enter the depreciation life
in years. |
|
Depreciation Method |
Select a depreciation
method. |
Depreciation is automatically recalculated based on the choices you make in the fields listed above and the results are shown in the depreciation grid. All fields in the depreciation grid are read-only.
Cost to own
|
Field Name |
Comments |
|
Cost period: amount per |
Select a unit of time here.
The default is “Year”. |
|
Cost to own grid |
Use the Add Line button to add as many owner
costs as you wish. These are the costs
per unit of measure you picked in the Cost
period: amount per field. In other words, if you selected “Year” as the
unit of measure enter the annualized costs on each line. |
|
Total per cost period |
This field is read-only and
is the sum of the Amounts you entered in the Cost to own grid. |
|
Convert cost period to hours rate |
This field is a conversion factor,
which converts from the unit of measure you selected at the top of this
column to hours. The default is “1.00”. |
|
Cost to own per hour |
This field is read-only and
is calculated as Total per cost
period/ Convert cost period to hours rate. |
Cost to operate
|
Field Name |
Comments |
|
Cost period: amount per |
Select a unit of time here.
The default is “Year”. |
|
Cost to operate grid |
Use the Add Line button to add as many owner
costs as you wish. These are the costs
per unit of measure you picked in the Cost
period: amount per field. In other words, if you selected “Year” as the
unit of measure enter the annualized costs on each line. |
|
Total per cost period |
This field is read-only and
is the sum of the Amounts you entered in the Cost to operate grid. |
|
Convert cost period to hours rate |
This field is a conversion factor,
which converts from the unit of measure you selected at the top of this
column to hours. The default is “1.00”. |
|
Cost to own per hour |
This field is read-only and
is calculated as Total per cost
period/ Convert cost period to hours rate. |
|
Total cost of ownership |
This field is read-only and
equals Cost to own per hour + Cost to operate per hour |
Notes
See The Notes Tab.
Attachments
See The Attachments Tab.
Workflow
See Workflow.
Inventory Locations
PMWeb allows you to add inventory to designated inventory locations, track its movement, and charge it to projects and work orders.
Header Fields
![]()
|
Field Name |
Comments |
|
Location ID |
This field is required. |
|
Name |
This field is not required. |
|
Linked to |
This field is required.
Click the ellipsis button to link this Inventory Location to a PMWeb
Location, Building, Floor, Space or Equipment record. |
|
Location Type |
This field is not required.
This is a user-defined list. |
|
Capacity |
This field is not required.
Enter a number that quantifies the capacity of this Inventory Location. |
|
UOM |
This field is not required.
The unit of measure of the Capacity. |
|
Revision |
This field is read-only.
Revisions are editable copies of a record. You may create as many revisions
to a record as you wish. A new record is designated revision 0. Only the
newest revision can be edited. Older revisions are locked as “Inactive”. |
|
Date |
This field is read-only.
The date the revision was created. |
|
Status |
The default status is
“Draft”. This field may be edited at any time to reflect the record’s
movement through an approval process. See Workflow for details about
automating the approval process. |
Sub-locations Grid
Use the Sub-locations grid to break down the Inventory Location into smaller units. Stock may be added to and moved between Sub-locations.
|
Field Name |
Comments |
|
Sub-location ID |
This field is required. |
|
Name |
This field is not required. |
![]()
The Stock grid displays the entire inventory, both past and present, which was stored in this Inventory Location.
Use the filter drop-down to display:
- Current stock only - (Those lines in the grid where the On Hand field is greater than zero.)
- Past stock only - (Those lines in the grid where the On Hand field is zero.)
- All stock - (Both current & past stock.)

The Stock Filter Drop-down
Stock Grid
|
Field Name |
Comments |
|
Stock # |
This field is read-only. Stock # is automatically assigned
whenever inventory is added or split. It is a unique ID across all PMWeb
records. |
|
Sub-location |
This field is not required.
See Sub-locations
Grid for information on sub-locations. |
|
Item |
This field is required. Use
the drop-down list to select an item from the PMWeb database. |
|
Description |
This field is not required.
By default it is the Description
of the Item. |
|
UOM |
This field is not required.
By default it is the UOM of the
Item. |
|
Stocked |
This field is required.
Enter a number greater than zero. By default it is “1.00”. |
|
Used |
This field is read-only.
See Stock Moves for information on making
stock “Used”. |
|
Unusable |
This field is read-only.
See Stock Moves for information on making
stock “Unusable”. |
|
Moved |
This field is read-only.
See Stock Moves for information on moving
stock. |
|
On Hand |
This field is read-only. It
is equal to Stocked - Used - Unusable - Moved. |
|
Unit Cost |
This field is required. By
default it is “0.00”. |
|
Ext. Cost |
This field is read-only. It
is equal to On Hand x Unit Cost. |
|
Manufacturer |
This field is not required.
By default it is the Manufacturer
of the Item. |
|
Mfr. # |
This field is not required.
By default it is the Mfr. # of the
Item. |
|
Serial # |
This field is not required. |
|
|
This field is not required. |
|
Add Date |
This field is required. By
default it is today’s date. |
|
Notes |
This field is not required. |
Inventory Moves
Stock may be moved using PMWeb’s Inventory Moves feature. You may move all or part of a batch of stock or split the batch into multiple batches. If you split the stock, all of the new batches receive new Stock IDs. Inventory Moves is also used to mark stock batches as “Used” or “Unusable”.
Creating Inventory Moves
To create an Inventory Move record, select a line in the Stock Grid that has an On Hand quantity greater than zero (Past Stock may not be moved.) and click the Move line button. The Stock Move dialog opens.
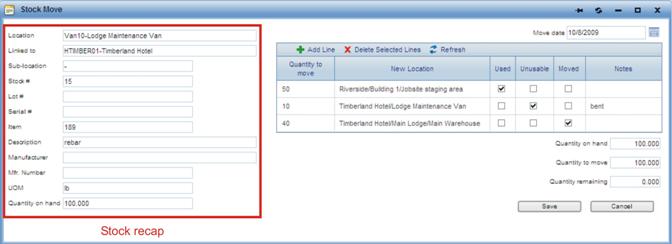
The Stock Move Dialog
On the left side of the dialog are the Stock recap fields that show the current information for the stock line you selected to move, including the Quantity on hand. On the right side of the dialog is the Stock Move grid.
Stock Moves Grid
|
Field Name |
Comments |
|
Quantity to Move |
This field is required. It must
be greater than zero. |
|
New Location |
This field is required. It
may be the same as the current inventory location, if you wish. |
|
Used, Unusable, Moved |
You must select one of
these options. |
|
Notes |
This field is not required. |
Add as many lines to the grid as you wish. When you are finished click the Save button. When you click Save the following events occur:
- If any lines in the Stock Moves grid have a New Location that matches the current Location the original stock record is updated with the quantities you marked “used”, “unusable” or “moved”.
- New stock records are created for any lines in the in the Stock Moves grid where New Location does not match the current Location with the quantities “used”, “unusable” or “moved”.
- The Stock Move dialog closes.
- The Stock Grid in the Inventory Locations window is requeried.
Note: The Quantity to move field must not be
greater than the Quantity on hand.
Therefore, if Quantity remaining is
a negative number when you click the Save button an error message is displayed
and the save procedure stops. If this happens, adjust the lines in the grid and
try again.
Viewing Move History
To view the moves history for any stock item, select it in the Stock Grid and then click the View move history button. The Stock Move History dialog opens.
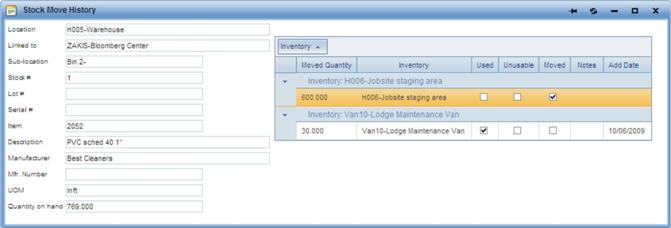
The Stock Move History Dialog
When you have finish viewing the history you can close the dialog using the close button in the upper right corner of the window.
Note: All
fields in the Stock Move History dialog are read-only.
Notes
See The Notes Tab.
Attachments
See The Attachments Tab.
Workflow
See Workflow.
Suites
Suites are a convenient way for you to group assets that are leased together.
Header Fields
Field Name | Comment |
Location* | Location for the suite. |
Building | Building where suites is located. |
Floor | Floor where suite is located. |
ID* | Suite identifier. |
Name | Name for the suite. |
Suite Type | Type for the suite. |
Sub-Type | Sub-type for the suite. |
Linked Gross | Gross area for linked assets. |
Linked Usable | Usable area for linked assets. |
Linked Rentable | Rentable area for linked assets. |
Status | Approval status. This field can be set manually. Status is automatically filled out if the document is in Workflow. |
Revision | Revision number for the suite. |
* Required Fields
Snapshot
The snapshot area in the page header allows you to specify the market rate and also the current rate. All data for current rate is read-only. The fields for the suite snapshot are described below.
Field Name | Comment |
Rent/Month | Rent per month, market and current**. |
Rent/Year** | Rent per year, market and current. |
Gross Area | Gross area for suite. |
Rentable | Rentable area for suite. |
Usable | Usable area for suite. |
Rent/Area/Month** | Rent per area per month, market and current. |
Rent/Area/Year** | Rent per area per year, market and current. |
** Read-Only Fields
Visual Calculator
With the Visual Calculator you calculate Gross, Rentable, and Usable areas from drawings. To determine areas using the Visual Calculator do the following
- Click this button
 to open the Visual Calculator.
 - If necessary, select a drawing for the location.
- Drag and drop measurements from drawing into the calculation boxes. The calculator sums up the amounts.
- Update the calculated numbers manually, if you wish.
- To remove a measurement, drag and drop away from the calculation boxes.
- Click Save to copy the calculation results to the Gross, Rentable, and Usable areas.
Details Fields
Fields on the Details tab are described here.
Field Name | Comment |
Address | |
Address 1 | First address line. |
Address 2 | Second line for the address. |
City | City for the suite. |
State | State for the suite. |
Zip | Zip code. |
Country | Country |
Phone | Phone number. |
Fax | Fax number. |
Tags (Geo-Location Data) | |
Latitude | Latitude. Type manually or click the label to retrieve from Google map. |
Longitude | Longitude. Type manually or click the label to retrieve from Google map. |
Elevation | Elevation. Type manually or click the label to retrieve from Google map. |
Google Address | Address for Google to retrieve geo-location data. |
Linked Assets | |
Primary Location | Primary location for the asset. |
Building | Building for the asset. |
Floor | Floor where the asset is located. |
Space | Space for the asset. |
Equipment | Equipment used. |
To Retrieve Geo-Location data with Google Maps
- Click any of the labels for Latitude, Longitude, Elevation, Google Address to open Google Maps.
- Do one of the following to retrieve geo-location data:
- Type an address in the Map Center field and click the right arrow.
- Drag and drop the map pin to the desired area.
- Click the map pin and select an address from the list shown.
or
or
- Click Save to transfer the data to the tags for the suite.
To Link Assets
- Click Link Assets.
- Select assets from the tree view.
- Drag and drop them onto the Assets list.
- Click Save to save and exit. Or click Close to exit without saving.
To Unlink Asset
- Select an asset from the list.
- Click Unlink Asset.
Leases
The Leases tab lists all the leases associated with the suite. The columns for the leases tab are described below.
Field Name | Comment |
Record # | ID for the lease. |
Status | Approval status for the lease. |
Parent Lease | Parent lease for sub-leases. |
Lease Type | Type of lease. |
Description | Description for the lease. |
Landlord | Name of Landlord. |
Tenant | Name of Tenant. |
Lease Start | Date when lease starts. |
Lease Finish | Date when lease ends. |
Rent/Month | Rent per month. |
Active | Indicates active lease. |
Notes
See The Notes Tab.
Attachments
See The Attachments Tab.
Workflow
See Workflow.
Leases
PMWeb now has features to manage leasing. You find here information to define leases.
Header Fields
Field Name | Comment |
Location* | Location for asset being leased. |
Parent Lease | Parent lease, if this is a sub-lease. |
Lease ID* | Lease unique identifier. |
Description | Lease description. |
Lease Type | Type of lease based on categories defined for your project. |
Post As | Post as Cost or Revenue. |
Linked Usable** | Usable area for linked asset. |
Linked Rentable** | Rentable area for linked asset. |
Landlord | Company name of Landlord. |
Tenant | Company name of Tenant. |
Agent | Company name of Agent. |
Status | Approval status. This field can be set manually. Status is automatically filled out if the document is in Workflow. |
* Required Fields
** Read-Only Fields
Snapshot
Field Name | Comment |
Rent/Month | Rent per month. |
Rent/Year** | Rent per year. |
Rentable | Rentable area. |
Usable | Usable area. |
Common Area % | Percent common area for usable space. |
Rent/Area/Month | Rent per area per month. |
Rent/Area/Year | Rent per area per year. |
Lease Start | Lease start date. |
Lease Finish | Lease finish date. |
** Read-Only Fields
Details Fields
Field Name | Comment |
Address | |
Address 1 | First address line. |
Address 2 | Second line for the address. |
City | City for the suite. |
State | State for the suite. |
Zip | Zip code. |
Country | Country |
Phone | Phone number. |
Fax | Fax number. |
Tags (Geo-Location Data) | |
Latitude | Latitude. Type manually or click the label to retrieve from Google map. |
Longitude | Longitude. Type manually or click the label to retrieve from Google map. |
Elevation | Elevation. Type manually or click the label to retrieve from Google map. |
Google Address | Address for Google to retrieve geo-location data. |
Linked Assets | |
Primary Location | Primary location for the asset. |
Building | Building for the asset. |
Floor | Floor where the asset is located. |
Space | Space for the asset. |
Equipment | Equipment used. |
Abstract
Field Name | Comment |
Lessor | Name of lessor. |
Lessee | Name of lessee. |
Address | Address of lessee. |
Description | Text to describe the abstract. |
Suite | Suite associated with lease. |
Comment | Comments. |
First Payment Date | First payment date. |
First Payment | First payment amount. |
Last Payment Date | Last payment date. |
Last Payment | Last payment amount. |
Signed Date | Date lease signed. |
Move-in Date | Planned move-in date. |
Move-out Date | Planned move-out date. |
Rental Term | Term for rental agreement. |
Renewal Term | Term for renewal. |
Billing Terms | Billing terms. |
Late Fee | Fee for late payment. |
Deposit Required | Amount of deposit required. |
Deposit Held | Amount of deposit held. |
Deposit Interest Rate | Deposit interest rate. |
Abatement | Abatement amount. |
Renewal Rent | Rent amount on renewal. |
Clauses
PMWeb allows you to build the lease language with clauses that you add on the fly or by selecting from clauses pre-defined for your project. From the Clauses tab you can manage clauses as follows.
- Add clauses manually
- Add pre-defined clauses
- Edit clauses
- Delete clauses
Adding Clauses Manually
- Click Add.
- Specify the fields for the clause.
- Click Save at the top of grid to save and exit. Click Cancel to exit without saving.
Adding Pre-Defined Clauses
You set up pre-defined clauses in Portfolio > Lists > Clauses. Once you have pre-defined clauses, you add them to a lease as follows.
- Click Add Clause(s).
- Specify defaults for clauses, if any.
- In Group By select categories to group the clauses.
- Expand a category.
- Click to select a clause. Drag and drop onto the clauses grid.
The fields for clauses are defined in the following table.
Field Name | Comment |
Line # | Line number for the clause. |
Paragraph | Paragraph number for the clause. |
Category | Project-specific category. |
Type | Project-specific type. |
Description | Short description for clause. |
Text | Full text for the clause. |
Responsible | Party responsible: Landlord, Tenant, All parties, or other defined party. |
Start | Start date. |
Days To Start | Days until start date. |
End | End date. |
Days To End | Days until end date. |
Notes | Notes for the clause. |
Inactive | Click to mark the clause as inactive. |
Editing Clauses
- Click to select a clause. Shift-click to select multiple clauses.
- Click Edit.
- Update the input fields.
- Click Save at the top of the grid to save and exit. Click Cancel to exit without saving.
Deleting Clauses
- Click to select a clause. Shift-click to select multiple clauses.
- Click Delete.
Charges
PMWeb allows you to specify periodic or one-time charges associated with a lease. You specify charges manually for a lease or you pre-define charges that you re-use within many leases. From the Charges tab you do the following.
- Add charges manually
- Add pre-defined charges
- Edit charges
- Delete charges
- Analyze lease charges
Adding Charges Manually
- Click Add.
- Specify the charges fields.
- Click Save at the top of the grid to save and exit. Click Cancel to exit without saving.
Adding Pre-Defined Charges
You set up pre-defined charges in Asset Management > Setup > Lease Charges. Once you have pre-defined charges, you add them to a lease as follows.
- Click Add Charge(s).
- Specify defaults for charges, if any.
- In Group By select grouping categories.
- Expand a category.
- Click to select a charge. Drag and drop onto the charges grid.
The fields for charges are defined in the following table.
Field Name | Comment |
Line # | Line number for the charge. |
Start | Start date. |
End | End date. |
Type | Type of charge based on pre-defined categories. |
Description | Description for the charge. |
Post Every | Frequency for posting charge. |
Est. | Check if charge is estimated. |
UOM | Unit of measurement. |
Quantity | Quantity. |
Unit Cost | Unit cost. |
Amount | Amount based on quantity and unit cost. |
Annualized** | Annualized charges. |
Annual $/sqft | Annual cost per area. |
Cost Code | Cost code for posting charges. |
Last Posted | Date last posted. |
Next Posting | Next posting date. |
Asset(s) | Asset linked to charge. |
Notes | Notes for charge. |
Charge ID** | Charge ID. |
Inactive | Check to make charge inactive. |
System ID | System ID for pre-defined charges. |
** Read-Only Fields
Analyzing Lease Charges
- Click Analyze Lease to open the Lease Analyzer.
- Click the close button at the top right to exit.
Lease Ledger
Lease payments and charges, and all other lease-related transactions, are posted on the Lease Ledger. The ledger fields are described in the following table.
Field Name | Comment |
Date | Date when transaction was posted. |
Transaction Source | Source for transaction. |
Type | Type of transaction, e.g. charge, payment. |
Invoice | Tenant invoice. |
ID | Transaction ID. |
Description | Transaction description. |
Amount | Transaction amount. |
Balance | Balance amount. |
Due Date | Due date for ledger item. |
Days Overdue | Number of days overdue. |
Cost Code | Cost code for item. |
Cost Period | Cost period for item. |
Notes | Notes for item. |
Workflow Status | Workflow status. |
System ID | System ID. |
Batch ID | Batch ID. |
Notes
See The Notes Tab.
Attachments
See The Attachments Tab.
Workflow
See Workflow.
Lease Administrator
The Lease Administrator automates the process of posting lease transactions: basic charges, recoveries, overages, escalations...
Header Fields
Field Name | Comment |
Location* | Location associated with Lease Administrator. |
Batch ID* | Lease Administrator batch ID. |
Batch Description | Batch description. |
Type | Type based on project-specific categories. |
Status | Approval status. This field can be set manually. Status is automatically filled out if the document is in Workflow. |
Batch Date | Batch date. |
Invoice Date | Invoice date. |
Posted Date** | Date when posted. |
Cost Period | Cost Period for posting transactions. |
Operating Project** | Project associated. |
Deactivate Expiring Charges | Check to deactivate charges. |
*Required Fields
**Read-Only Fields
Recap
Field Name | Comment |
Scheduled Total | Sum of scheduled charges. |
Recoveries Total | Sum of recoveries. |
Escalations Total | Sum of escalations. |
Overages Total | Sum of overages. |
Grand total | Sum of all charges. |
Scheduled Charges
Field Name | Comment |
What To Post | |
Next Posting From | Start date for next posting. |
Next Posting To | End date for next posting. |
Charge Types | Types of charges to post. |
Post Every | Show posted charges for selected frequency. |
Scheduled Charges Recap | |
Total Charges # | Number of all charges. |
Total Charges Amount | Sum of all charges. |
Selected To Post # | Number of charges selected to post. |
Selected To Post Amount | Sum of charges selected to post. |
Preview | |
Post | Click to select a line to post. |
Lease | Lease associated. |
Suite | Suite associated. |
Tenant | Tenant associated. |
Type | Type based on project-specific categories. |
Description | Description. |
Post Every | Frequency for posting. |
Est. | Click if amount estimated. |
Amount | Amount. |
UOM | Unit of measurement. |
Cost Code | Cost code associated. |
Notes | Notes for item. |
Quantity | Quantity |
Charge System ID | System ID. |
Unit Cost | Unit cost. |
Recoveries
Field Name | Comment |
What To Post | |
Costs From | Start date for costs posted. |
Costs To | End date for costs posted. |
Charge Types | Types for charges posted. |
Next Posting From | Start date for next posting. |
Next Posting To | End date for next posting. |
Post Every | Show posted charges for selected frequency. |
Document Type | Type based on project-specific categories. |
Cost Code | Cost code associated. |
Include Estimated Charges in Calculations | Click to select to include estimated charges in calculations. |
Recoveries Recap | |
Total Costs # | Number of all costs. |
Total Costs Amount | Sum of all costs. |
Total Recovered # | Number of all recovered costs. |
Total Recovered Amount | Sum of all recovered costs. |
Costs | |
Line # | Line number for cost. |
Date | Date for cost. |
Document | Number for associated document or invoice. |
Document Type | Type of associated document or invoice. |
Item | Associated item. |
Description | Description. |
UOM | Unit of measurement. |
Quantity | Quantity. |
Unit Cost | Unit cost. |
Total Amount | Amount. |
Cost Code | Cost code associated. |
Cost Ledger ID | Cost ledger ID. |
Overages
Field Name | Comment |
What To Post | |
Next Posting From | Start date for next posting. |
Next Posting To | End date for next posting. |
Charge Types | Types of charges to post. |
Post Every | Show posted charges for selected frequency. |
Scheduled Charges Recap | |
Total Charges # | Number of all charges. |
Total Charges Amount | Sum of all charges. |
Selected To Post # | Number of charges selected to post. |
Selected To Post Amount | Sum of charges selected to post. |
Preview | |
Post | Click to select a line to post. |
Lease | Lease associated. |
Suite | Suite associated. |
Tenant | Tenant associated. |
Type | Type based on project-specific categories. |
Description | Description. |
Post Every | Frequency for posting. |
Est. | Click if amount estimated. |
Actual Amount | Actual amount. |
UOM | Unit of measurement. |
Quantity | Quantity |
Unit Cost | Unit cost. |
Overage Amount | Overage amount. |
Cost Code | Cost code associated. |
Notes | Notes for item. |
Charge System ID | System ID. |
Escalations
Field Name | Comment |
What To Post | |
Next Posting From | Start date for next posting. |
Next Posting To | End date for next posting. |
Charge Types | Types of charges to post. |
Post Every | Show posted charges for selected frequency. |
Scheduled Charges Recap | |
Total Charges # | Number of all charges. |
Total Charges Amount | Sum of all charges. |
Selected To Post # | Number of charges selected to post. |
Selected To Post Amount | Sum of charges selected to post. |
Preview | |
Post | Click to select a line to post. |
Lease | Lease associated. |
Suite | Suite associated. |
Tenant | Tenant associated. |
Type | Type based on project-specific categories. |
Description | Description. |
Post Every | Frequency for posting. |
Est. | Click if amount estimated. |
UOM | Unit of measurement. |
Current Quantity | Current quantity |
Current Unit Cost | Current unit cost. |
Current Amount | Current amount. |
New Quantity | New quantity. |
New Unit Cost | New unit cost. |
New Amount | New amount. |
New Line | New line. |
Cost Code | Cost code associated. |
Notes | Notes for item. |
Charge System ID | System ID. |
Notes
See The Notes Tab.
Attachments
See The Attachments Tab.
Workflow
See Workflow.
Tenant Invoices
Header Fields
Field Name | Comment |
Location* | Location associated with invoice. |
Lease* | Lease associated with invoice. |
Tenant** | Company name for tenant. Filled out automatically from lease. |
Invoice # | Invoice number. |
Description | Description. |
Post As** | Post as cost or revenue. Automatically filled out from lease. |
Status | Invoice approval status. This field can be set manually. Status is automatically filled out if the item is in Workflow. |
Revision | Revision number. |
Batch ID** | Batch ID. |
Invoice Date | Invoice date. |
Billing Terms | Billing terms. |
Due Date | Invoice due date. |
Cost Period | Cost period for invoice. |
Type | Type of invoice based on project-specific selection. |
Category | Category of invoice based on project-specific selection. |
Paid in Full | Check to mark invoice as paid in full. Will not be shown for any further transactions. |
*Required Fields
**Read-Only Fields
Recap
Field Name | Comment |
Total Cost | Total cost for invoice. |
Total Price | Total price for invoice. |
Payments Applied | Sum of payments applied to invoice. |
Open Balance | Unpaid balance for invoice. |
Details
Field Name | Comment |
Line # | Line number. |
Item | Item associated. |
Description | Description. |
UOM | Unit of measurement. |
Quantity | Quantity. |
Unit Cost | Unit cost. |
Ext Cost | Extended cost. |
Adjustment 1 | Adjustment 1. |
Tax | Tax amount. |
Adjustment 2 | Adjustment 2. |
Unit Price | Unit price. |
Price | Price. |
Cost Code | Cost code associated. |
Cost Type | Cost type. |
Charge Type | Type of charge. |
Notes | Notes. |
Payments
Field Name | Comment |
ID | Payment ID. |
Status | Payment approval status. This field can be set manually. Status is automatically filled out if the Payment is in Workflow. |
Company | Company name. |
Description | Descriptive text for the Payment Batch. Will be shown on the Payments Batches list along with a unique ID. |
Payment Method | Method for payments, e.g. wire transfer, check. |
Payment # | User-specified memo field to add a number for the payment. |
Payment Date | Date when payment is being made. |
Payment Amount | User-specified payment amount. |
Cost Code | Cost code to which payment will be applied. If Cost Code is specified, the Payment is posted to the Cost Ledger. |
Period | Cost period to which payments will be applied. |
Type | Type of payment based on types defined for your PMWeb site. |
Category | Category of payment based on categories defined for your PMWeb site. |
Reference | Reference memo for the Payment. |
Notes | User notes for the Payment. |
Applied in Full | Select to specify whether payment is used in full. When this box is checked, the payment will not be shown in payment lists for any further invoice payments. |
Notes
See The Notes Tab.
Attachments
See The Attachments Tab.
Workflow
See Workflow.
Payments
PMWeb now allows you to create payments to apply to tenant invoices. Individual payments can be created and used individually. Payments can also be grouped in batches which combine all the funds for application to one or more invoices. Payments can be created from within a Payments record or directly on the Payments tab in an invoice. Payments can also be imported into PMWeb with the Integration Manager. Payments are structured both as inbound payments for revenue leases or Accounts Receivable (A/R) and outbound payments for cost leases or Accounts Payable (A/P).
Payments can be applied at different levels:
- Program
- Location
- Lease
- Tenant Invoice
We will describe here the PMWeb Payments Pages.
Header Fields
Before entering any of the Payments fields, you must know at what level you will apply the payment and specify the field for that level first. The Payments Header fields are described in the table below.
Field Name | Comment |
Program* | Specify this field if you are applying the payment at the Program level. Otherwise it is filled automatically. This field is required. |
Location* | Specify this field if you are applying the payment at the Location level. Otherwise it is blank. If you make a selection, the label for this field is hyperlinked to the Location record. This field is required. |
Lease | Specify this field if you are applying the payment at the Lease level. Otherwise it is filled automatically. |
Linked A/R or A/P Invoice | Specify this field if you are applying the payment at Tenant Invoice level. Otherwise it is blank. If you make a selection, the label fort this field is hyperlinked to the Invoice. |
Description | Descriptive text for the payment. Will be shown on the Payments list along with a unique ID. |
Currency | Payment currency. Read-only field, filled out from currency chosen for the database. |
Payment Batch | Payment batch number. Read-only field with the number for any Batch number to which this payment is linked. You would link a Payment on the Payment Batches page. |
Status | Payment approval status. This field can be set manually. Status is automatically filled out if the Payment is in Workflow. |
Open Balance | Unpaid amount for any invoice linked to payment. |
Payment Amount | User-specified payment amount. |
Cost Code | Cost code to which payment will be applied. |
Period | Cost period to which payment will be applied. |
Invoice # | User-specified memo field to add a number for the actual invoice being paid. |
Payment Method | Method for payment, e.g. wire transfer, check. |
Payment # | User-specified memo field to add a number for the payment. |
Payment Date | Date when payment is being made. |
Company | Company to which payment is made or from which payment was received. |
Type | Type of payment based on types defined for your PMWeb site. |
Category | Category of payment based on categories defined for your PMWeb site. |
Reference | User-specified memo field for payment reference information. |
Notes | Additional notes. |
Applied in Full | Select to specify whether payment is used in full. When this box is checked, the payment will not be shown in payment lists for any further invoice payments. |
* Required Fields
Additional Applications
This tab shows a list of all records where funds were applied from this payment.
Field Name | Comment |
ID | Identifier for payment application. |
Program | Program for the payment. |
Location | Location for the payment. |
Lease | Lease for the payment. |
Linked A/R or A/P Invoice | Tenant Invoice for the payment. |
Applied Amount | Amount for that payment. |
Payment Date | Date when payment made. |
Specifications
See Specifications.
Notes
See The Notes Tab.
Attachments
See The Attachments Tab .
Workflow
See Workflow.
Payments Batches
Payment Batches are a convenient way to group together Payments, to pool the funds and apply them to invoices. You have the flexibility to link existing Payments to a Payment Batch or to create a Payment within a Payment Batch. The sum of all Payments within the batch is shown in the recap at the top of the page.
Header Fields
Field Name | Comment |
Program* | Specify this field to link the Payment Batch at the Program level. Otherwise it is filled in automatically when you select a location. This field is required. |
Location* | Specify this field to link the Payment Batch to a Location. This field is required. |
ID* | Batch ID. Uses the number pattern specified in the Portfolio settings. |
Company | Company for the Payment batch. Specify this field only to link the batch to a specific company. |
Description | Descriptive text for the Payment Batch. Will be shown on the Payments Batches list along with a unique ID. |
Currency | Payment currency. Read-only field, filled out from currency chosen for the database. |
Period | Cost period to which payments will be applied. |
Status | Approval status. This field can be set manually. Status is automatically filled out if the document is in Workflow. |
Memo Fields | |
Payment Memo Total | Memo field to specify a payment amount. |
Payment Method | Method for payments, e.g. wire transfer, check. |
Payment # | User-specified memo field to add a number for the payment. |
Payment Date | Date when payment is being made. |
Type | Type of payment based on types defined for your PMWeb site. |
Category | Category of payment based on categories defined for your PMWeb site. |
Reference | User-specified memo field for payment reference information. |
Payment Recap | |
Payment Amount | User-specified payment amount. |
Applied | Amount already applied. |
Unapplied | Amount unapplied and available for invoice payments. |
Posted | Amount posted. |
Unposted | Amount unposted. |
Applied in Full | Select to specify whether payment is used in full. When this box is checked, the payment will not be shown in payment lists for any further invoice payments. |
* Required Fields
Details Tab
From the Details Tab you can perform these actions with Payments.
- Add Payments
- Link Payments
- Unlink Payments
- Edit Payments
- Delete Payments
- Pay Invoices
For each Payment the Details grid shows the information in the following table.
Field Name | Comment |
Line # | Number assigned to the Payment in the grid. |
Program* | Program associated with the Payment. |
Location | Location associated with the Payment. |
Lease | Lease associated with the Payment. |
ID | Payment ID. |
Linked A/R or A/P Invoice | Tenant Invoice associated with the Payment. |
Company | Company name. |
Invoice # | Internal invoice number. |
Payment Method | Method for payments, e.g. wire transfer, check. |
Payment # | User-specified memo field to add a number for the payment. |
Payment Date | Date when payment is being made. |
Description | Descriptive text for the Payment Batch. Will be shown on the Payments Batches list along with a unique ID. |
Open Balance | Unpaid amount for any invoice linked to payment. |
Payment Amount | User-specified payment amount. |
Cost Code | Cost code to which payment will be applied. If Cost Code is specified, the Payment is posted to the Cost Ledger. |
Period | Cost period to which payments will be applied. |
Type | Type of payment based on types defined for your PMWeb site. |
Category | Category of payment based on categories defined for your PMWeb site. |
Reference | Reference memo for the Payment. |
Status | Payment approval status. This field can be set manually. Status is automatically filled out if the Payment is in Workflow. |
Revision | Revision number. |
Notes | User notes for the Payment. |
Applied in Full | Select to specify whether payment is used in full. When this box is checked, the payment will not be shown in payment lists for any further invoice payments. |
* Required Fields
Add Payments
You can add payments directly from the Payment Batch if you had not already created a payment record. When you do this, the payment is automatically added to the invoice, if you select one. To add a payment do the following:
- Click Add Payments. This creates a new line for you to specify the payment information.
- To specify a payment at the lease level, specify that field. If you prefer, select a Tenant Invoice for the payment. The associated lease will be filled out automatically.
- Specify Payment Amount and any other information you want to include from the fields described in the Details grid above.
- Click Save to create the payment. This will add the payment to Lease or Invoice. The payment should be reflected in the Tenant Invoice recap and should also be shown on the Payments Tab and on the Lease Ledger.
Link Payments
To link existing payments to a Payment Batch do the following.
- Click Link Payments. The Link Payments pop-up opens.
- In Group by, select an option for grouping the payments.
- From the folders, find the payments you want to include.
- Select then drag and drop Payments into the Payments table.
Unlink Payments
To unlink a previously linked invoice do the following.
- Select one or more Payments from the List.
- Click Unlink Payments.
Pay Invoices
Click Pay Invoices on the Payment Batch Details tab to open a pop-up and make invoice payments. There are two ways for you to pay invoices:
- With the Auto-Apply feature
- With user-specified payment amounts or percentages
To Pay Invoices with Auto-Apply
With Auto-Apply you select which Invoices to pay and automatically pay them off in sequence with the available funds. The payment amount for the last invoice will reflect the balance available in the Payment Batch.
- Select which Invoices to pay.
- Click Auto-Apply.
- Select Paid in Full for invoices to which no further payments should be applied. This is done automatically for invoices with no open balance.
- Click Save & Exit to save or click Cancel to exit without saving.
To Pay Invoices with User-Specified Amounts
- Specify payments as either a percentage of the invoice or a fixed amount.
- Select Paid in Full for invoices to which no further payments should be applied, whether or not there is an open balance. This is done automatically for invoices with no open balance.
- Click Save & Exit to save or click Cancel to exit without saving.
Pay Invoices Fields
Field Name | Comment |
Header | |
Program | Program associated with the Payment Batch. |
Location | Location associated with the Payment Batch. |
Company | Company associated with the Payment Batch. |
Payment Memo Total | Memo field to specify a payment amount. |
Applied | Amount from Payment Batch already applied to invoices. |
Unapplied | Balance available from Payment Batch to pay invoices. |
Details | |
Program | Program associated with the Invoice. |
Location | Location associated with the Invoice. |
Company | Company associated with the Invoice. |
ID | Invoice ID. |
Description | Invoice description. |
Invoice Due | Invoice due date. |
Invoice # | Invoice number from memo field. |
Open Balance | Unpaid amount for the invoice. |
Percent | Percentage of Invoice Open Balance to pay. Specify one of Percentage or Applied. |
Applied | Amount of Invoice Open Balance to pay. Specify one of Percentage or Applied. |
Applied in Full | Select to specify whether invoice is fully paid, whether or not there is an open balance. When this box is checked, no further payments should be applied to the invoice. |
Specifications
See Specifications.
Notes
See The Notes Tab.
Attachments
See The Attachments Tab .
Workflow
See Workflow.
Work Orders
PMWeb Work Orders allow you to enter, track, dispatch and apply costs to any work related to your assets. You can make work orders recur at intervals you specify and link them to maintenance contracts if you wish.
Header Fields
![]()
|
Field Name |
Comments |
|
Location |
This field is required. |
|
Description |
This field is not required. |
|
Revision |
This field is read-only.
Revisions are editable copies of a record. You may create as many revisions
to a record as you wish. A new record is designated revision 0. Only the
newest revision can be edited. Older revisions are locked as “Inactive”. |
|
Date |
This field is read-only.
The date the revision was created. |
|
Status |
The default status is
“Draft”. This field may be edited at any time to reflect the record’s
movement through an approval process. See Workflow for details about
automating the approval process. |
|
Submitted By |
This field is read-only. It
is the User ID and Name of the user who created this work order. |
|
Assigned To |
If this work order has been
assigned to one or more resources in the Dispatch Board the resource name(s)
appear here. |
|
Scheduled |
If this work order has been
scheduled on one or more days in the Dispatch Board the dates appear here. |
Details Fields
![]()
|
Field Name |
Comments |
|
Contact Name |
This field is not required. |
|
Contact Phone |
This field is not required. |
|
Ext. |
This field is not required. |
|
Type |
This field is not required.
This is a user-definable list. |
|
Priority |
This field is not required.
This is a user-definable list. |
|
Reported |
This field is not required. |
|
Estimated Start |
This field is not required. |
|
Estimated Finish |
This field is not required. |
|
Approximate Duration |
This field is not required. |
|
Scope |
This field is not required. |
Assets Grid
You can link a work order to one or more assets.
|
Field Name |
Comments |
|
Building, Floor, Space, Equipment |
Use the Select Assets
dialog to populate the grid. |
Linking Assets
To link assets click the Add Assets button in the Assets grid header. The Select Assets dialog opens.
The Select Assets Dialog
You may link the work order to any combination of Location, Building, Floor, Space, and Equipment. Drag assets from the tree to the drop zone.
When you have finished selecting assets click the Save button. The dialog closes and the Assets grid is requeried.
Note: The tree
in the Select Assets dialog is filtered by the Location you selected on the
work order.
Preventive Fields
Use the Preventive tab to create one or more recurrences of the work order. All of the recurring work orders are linked to the original and are scheduled according to your choices. Work orders can recur:
- Once - Exactly one linked work order is created.
- Daily - One work order is created for each day at the interval you specify.
- Weekly - Work orders are created for each week on the day(s) you select at the interval you specify.
- Monthly - Work orders are created for each month on the day(s) you select at the interval you specify
You also have the option to Copy assigned resources from this Work Order. If you select this option by checking the box all of the resources assigned to the original work order will be copied to each of the linked work orders. If this box is unchecked, no assignments will be copied.
When you have selected and configured a Frequency, click the Create linked Work Orders button. A dialog opens asking you to confirm. When you click the Continue button the dialog closes and the linked work orders are displayed on the Preventive tab.
See Maintenance Contracts for more information on creating preventive work orders.
Resource Costs
Use the Resource Costs tab to enter costs for labor and equipment Resources incurred on this work order.
If Calculate Regular hours from Start & Finish is checked PMWeb will automatically default the Reg field as equal to Finish - Start.
The Labor Grid
|
Field Name |
Comments |
|
Item |
This field is read only. |
|
Resource |
This field is required. Use
the drop-down list to select the resource. |
|
Date |
This field is not required. |
|
Start |
This field is not required.
Type a time or use click the time picker button to select a time. |
|
Finish |
This field is not required.
Type a time or use click the time picker button to select a time. |
|
Reg |
This field is not required.
The number of hours at the resource’s Reg rate. |
|
OT |
This field is not required.
The number of hours at the resource’s OT rate. |
|
Prem |
This field is not required.
The number of hours at the resource’s Prem rate. |
|
Total Hours |
By default, this equals Reg + OT + Prem, but you may
also type a number in the field. |
|
Total Cost |
By default, this equals Reg, OT and Prem hours x
the resource’s respective rates, but you may also type a number in the field. |
|
Notes |
This field is not required. |
The Equipment Grid
|
Field Name |
Comments |
|
Item |
This field is read only. |
|
Resource |
This field is required. Use
the drop-down list to select the resource. |
|
Date |
This field is not required. |
|
Start |
This field is not required.
Type a time or use click the time picker button to select a time. |
|
Finish |
This field is not required.
Type a time or use click the time picker button to select a time. |
|
Operating |
This field is not required.
The number of hours at the resource’s Operating rate. |
|
Standby |
This field is not required.
The number of hours at the resource’s Standby rate. |
|
Idle |
This field is not required.
The number of hours at the resource’s Idle rate. |
|
Total Hours |
By default, this equals Operating + Standby + Idle, but
you may also type a number in the field. |
|
Total Cost |
By default, this equals Operating, Standby and Idle hours
x the resource’s respective rates, but you may also type a number in the
field. |
|
Notes |
This field is not required. |
Material Costs
- Use the Material Costs tab to enter costs incurred on this work order.
The Materials Grid
|
Field Name |
Comments |
|
Line # |
This field is read only. |
|
Item |
This field is read-only. If
this line was added by selecting an item or picking from inventory this is
the Item ID. Otherwise, this field is empty. |
|
Description |
This field is not required. |
|
Type |
This field is not required. |
|
UOM |
This field is not required. |
|
Quantity |
This field is not required.
The default is “1.00” |
|
Unit Cost |
This field is not required. |
|
Ext. Cost |
This field is not required. |
|
Stock # |
This field is read-only. If
this line was added using the Pick Inventory button, the Stock # appears
here; if not, this field is empty. |
|
Notes |
This field is not required. |
There are three methods for entering costs in the grid:
Add Line
Click the Add Line button in the grid header. A new line opens for editing.
Add Items
Click the Add Items button. The Add Items Dialog opens.
Pick Inventory
Click the Pick Inventory button. The Pick Inventory dialog opens.
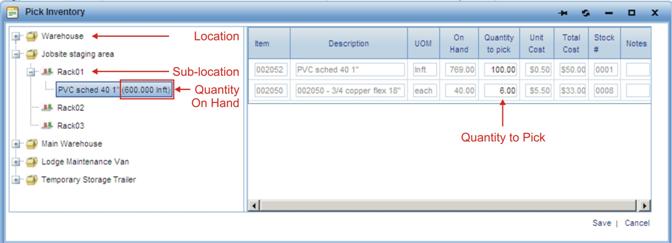
The Pick Inventory Dialog
The tree displays all inventory locations and sub-locations and items with stock on hand. The quantity on hand is displayed in parentheses. Drag stock from the tree to the drop zone and specify the Quantity to Pick.
When you have finished picking inventory click the Save button. The dialog closes and the Materials Costs grid is updated.
Cost Totals
The Cost Totals grid displays the costs you enter, grouped by type as well as a grand total for the work order.
Notes
See The Notes Tab.
Attachments
See The Attachments Tab.
Workflow
See Workflow.
Work Requests
Using PMWeb the occupants or staff of any of your assets may quickly and easily submit work requests online. Work requests, if desired, can be converted to a work order with one click.
Header Fields
![]()
|
Field Name |
Comments |
|
Work Request ID |
This field is read-only. |
|
Created |
This field is read-only.
The date the record was added. |
|
Submitted By |
This field is read-only.
The ID and Name of the user that created the record. |
|
Location |
This field is required.
Select a location from the drop-down list. |
|
Unit(s) |
This field is not required. |
|
Tenant(s) |
This field is not required. |
|
Contact Name |
This field is required. |
|
Contact Phone Day, Ext. |
This field is required. |
|
Contact Phone Night, Ext. |
This field is not required. |
|
Contact Email |
This field is not required. |
|
Brief Description |
This field is required. |
|
Please describe the issue in detail |
This field is not required. |
|
Attach documents… |
Assets Grid
You can link a work request to one or more assets.
|
Field Name |
Comments |
|
Building, Floor, Space, Equipment |
Use the Select Assets
dialog to populate the grid. |
Linking Assets
To link assets click the Add Assets button in the Assets grid header. The Select Assets dialog opens.
The Select Assets Dialog
You may link the work request to any combination of Location, Building, Floor, Space, and Equipment. Drag assets from the tree to the drop zone.
When you have finished selecting assets click the Save button. The dialog closes and the Assets grid is requeried.
Note: The tree
in the Select Assets dialog is filtered by the Location you selected on the
work request.
Dispatch Board
The PMWeb Dispatch Board makes scheduling and assigning work orders drag-and-drop simple.
Work Orders Tree Fields
![]()
|
Field Name |
Comments |
|
Board |
Select the dispatch board
you wish to load. See Configure Dispatch Boards. |
|
Group By |
The selection you make here
determines the appearance of the Work Orders Tree. When you select a new Group By option the tree is automatically
redrawn. |
|
Filter By |
Select on of three Filter By options. |
Using the Dispatch Board
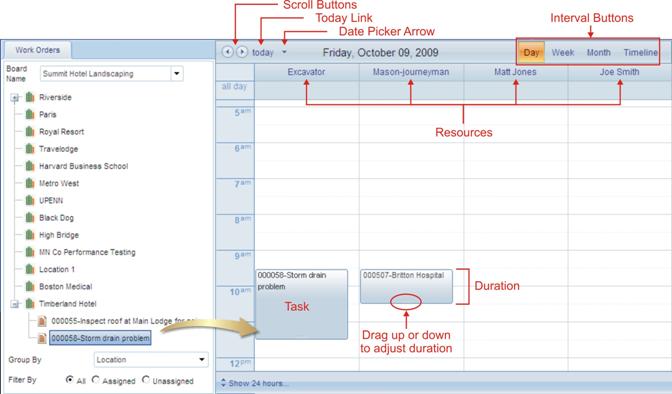
The Dispatch Board
Use the tree to locate the work order you wish to schedule. Click and drag it to the calendar control and drop it under the column for the resource you wish to assign it to and at the time you want them to start. With the work order as a task in the calendar control you can:
- Click and drag the task to a new time or to a different resource column.
- Click the bottom edge of the task and drag up and down to adjust its duration.
- Double-click the task to open the associated work order.
- Delete the assignment by hovering over the task and clicking the X button.
Changing the Appearance of the Calendar Control
The calendar control header contains a number of controls that allow you to change the way the calendar control appears:
- The Scroll Buttons page through the calendar. The left button scrolls to the past. The right button scrolls to the future.
- Click the Today Link displays today’s date in any interval view.
- Click the Date Picker Arrow to display a calendar from which you can pick a date to display.
- Interval Buttons allow you to view the calendar by day, week or month. The timeline view compresses each day into one line.
Configure Dispatch Boards
PMWeb lets you create as many dispatch boards as you wish. Each dispatch board can contain any combination of resource columns.
Work Orders Tree Fields
![]()
|
Field Name |
Comments |
|
Board name |
This field is required.
Each board must have a unique name. |
|
Notes |
This field is not required. |
Resources Grids
Click the Display column in the grids to select which resources to display as columns in the dispatch board.
Note: Tasks
assigned to a resource on one dispatch board will also appear on any other
dispatch boards that display the resource.
Maintenance Contracts
Header Fields
Field Name | Comment |
ID* | Unique identifier. |
Description | Description for Maintenance Contract. |
Type | Type based on project-specific lists. |
Status | Approval status. This field can be set manually. Status is automatically filled out if the document is in Workflow. |
Bill to* | Company to bill for contract. |
Bill to Address | Billing address for company. |
Contact | Contact at company. |
*Required Fields
Details Fields
Field Name | Comment |
Overview | More detailed information about contract. |
Start | Start date. |
End | End date. |
Value | Dollar value of contract. |
Billing | Type of billing based on project-specific lists. |
Linked Work Orders | |
WO ID | Linked Work Order ID. |
Scheduled | Date when scheduled. |
Assigned To | Work Order resource assignment. |
*Required Fields
Linking Work Orders
To link work orders to the maintenance contract, do the following:
- From the Details tab, under Link Orders, click Add. This creates a new Work Order.
- Specify the fields as described in Work Orders.
Notes
See The Notes Tab.
Attachments
See The Attachments Tab.
Workflow
See Workflow.